Seeing Recoil 1: Why YouTube Became My Lab
I needed deterministic barrel-axis numbers for game feel, so I turned public firearm YouTube clips into a measurement lab instead of guessing recoil curves.
I kept tuning recoil in a first-person prototype by feel alone, and the numbers never stuck. A kick that looked right in a quiet room looked soft under full auto. A climb that matched one reference clip looked theatrical against another. The missing piece was not another curve editor. It was a way to extract a deterministic weapon-motion number from real footage and use that number as a reference for game feel — especially the barrel-axis angle change that reads as recoil.
This is part 1 of Seeing Recoil:
- 1. Why YouTube Became My Lab — this post
- 2. Detect the Gun, Then the Body
- 3. When the Green Lines Lied
- 4. Tip First, Then the Rails
The problem I actually had
Game-feel work loves adjectives. Soft. Snappy. Heavy. Punchy. Those words are useful in a design conversation and useless as a regression check. When I said “more muzzle climb,” I was asking for a change in a quantity I had never measured. When a teammate (or a future me) asked whether the new curve was closer to the reference, the only answer was “watch both clips and decide.”
That is fine for art direction. It is a bad loop for engineering. I wanted something closer to a lab notebook:
- Pick a public clip with a clear side or three-quarter view of a firearm during fire.
- Detect the weapon and enough of the body to know who is holding it.
- Estimate a barrel-axis angle on each usable frame.
- Read the change in that angle across the shot — call it weapon axis angle Δ.
- Carry that number into the feel discussion as a reference, not as a physics claim.
The goal is narrow on purpose. I am not building a general firearm detector for the open web. I am not trying to identify platforms, ranges, or people. I am trying to turn a few carefully chosen YouTube videos into motion references I can re-measure when the prototype changes.
Why YouTube instead of a motion-capture stage
I do not have a range day with calibrated cameras every time I change a recoil spring constant in a game. What I do have is an enormous public archive of people filming firearms outdoors, indoors, from hips, from tripods, and from phones. That archive is messy. Lighting is bad. Compression eats edges. Hands occlude rails. Multiple guns share a frame. Those flaws are exactly why the exercise is useful: if a pipeline can give me a stable angle Δ on a noisy public short, it will tell me something honest about what “stable” means.
There is also a creative reason. Game feel is not a physics simulation of a free-floating barrel in a vacuum. Players compare what they see in games to what they have seen in videos, movies, and other games. Starting from the same class of footage they already watch keeps the reference in the same visual language as the complaint.
Public framing matters here. The project is about measuring motion for reference — not a how-to for anything outside a screen, and not a targeting system. The output I care about is a number I can plot and compare, then use while tuning animation and camera response.
The five seed videos
I started with a small seed set instead of a giant scrape. Five clips are enough to expose lighting, framing, and multi-person failure modes without drowning the notebook in filenames.
- YouTube Short FPXuHKrMTwE
- WwZBpixr4Yc — the pilot clip I emphasize in this series
- Short RbRxdz8ofSs
- b2wOTXJ3wXk
- 2umbSAzgk-8
The pilot, WwZBpixr4Yc, earned that role for boring reasons: usable outdoor light, rifles held in a readable aim posture, and frames where both a gun box and a pose skeleton can coexist without the camera spinning. When a method fails on the pilot, I treat that as a method problem. When it only fails on a vertical short with heavy blur, I treat that as a coverage problem.
I download public clips for offline analysis. I do not republish the videos. The stills in this series are analysis overlays drawn on frames from those publicly available sources. If you follow the links above, you are looking at the same footage the overlays were built from.
What “weapon axis angle Δ” means at a high level
Imagine a line that roughly follows the bore — not the stock, not the optic housing, not the diagonal of a fat bounding box. On frame t that line has an image-plane angle. On frame t + k, after the shot disturbance, the angle has changed. The difference is Δ.
That Δ is not “recoil energy.” It is not a claim about chamber pressure. It is a visual angle change in a specific camera projection of a specific clip. Used carefully, it is still extremely useful for game feel:
- It gives a magnitude I can compare across takes of the same clip.
- It gives a time shape I can compare to a game curve’s onset and recovery.
- It fails loudly when the line is wrong, which is better than a silent wrong curve.
Most of the engineering in this series is about making sure the line is the bore-ish axis I think it is. Looking at green rail candidates is not the same as measuring the tip. The later posts are basically a confession of how many times I confused those two.
Enhanced working copies without living in the dark
Outdoor firearm footage loves silhouette problems: bright sky, dark rifle, compression mush on the muzzle. Before I ask a detector or an edge filter to be clever, I make an enhanced working copy of the frames I care about.
The recipe is intentionally ordinary:
- Apply CLAHE to lift local contrast without blowing the whole histogram.
- Apply a mild gamma curve so midtones on the handguard and barrel separate from the sky.
- Keep the original frames around for sanity checks, because enhancement can invent edges as easily as it reveals them.
I treat the enhanced copy as a lab print, not as the archival master. Downstream steps — YOLO gun boxes, pose skeletons, tip search — can run on the enhanced frames when the raw ones are too flat. The stills below are exactly that kind of working copy: detector and pose overlays on enhanced frames from the pilot clip.
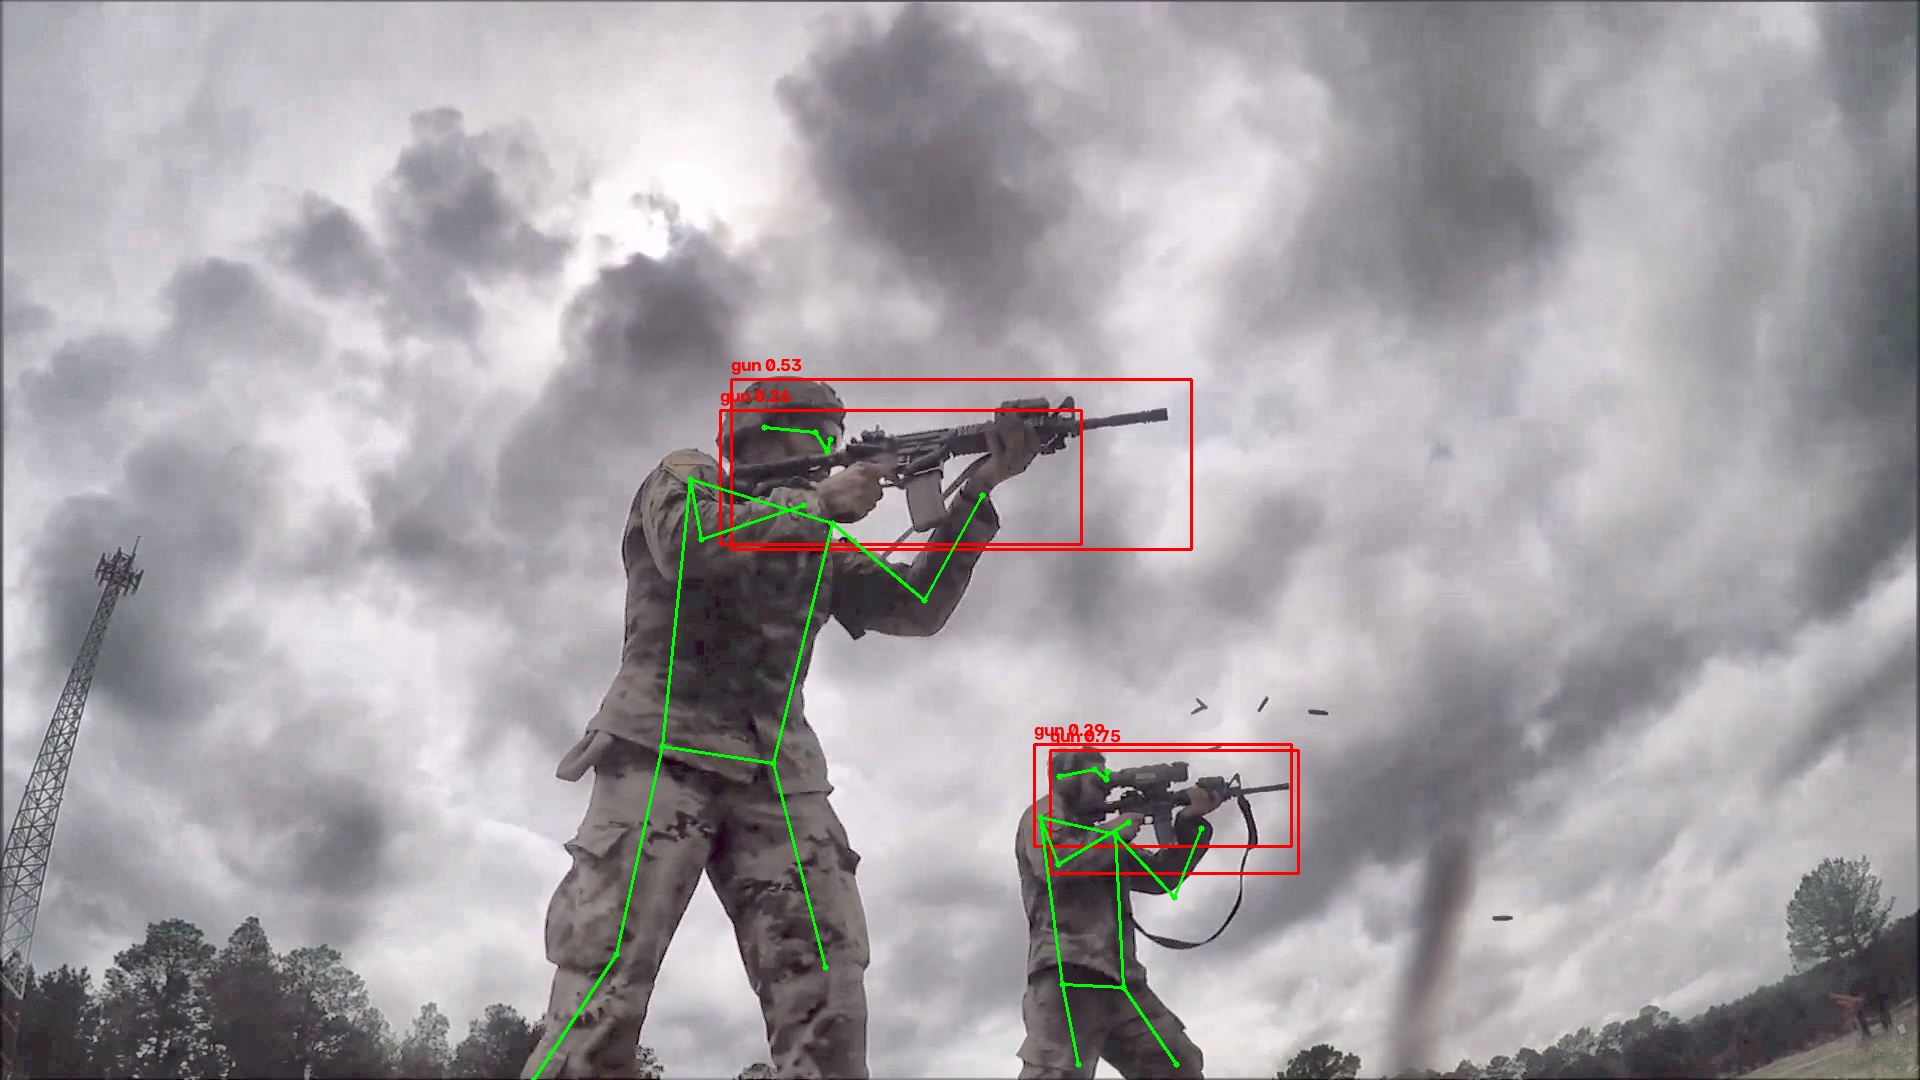
Frame 240 of the pilot clip after CLAHE+gamma enhancement, with red gun boxes and green pose skeletons overlaid. Source footage: WwZBpixr4Yc.
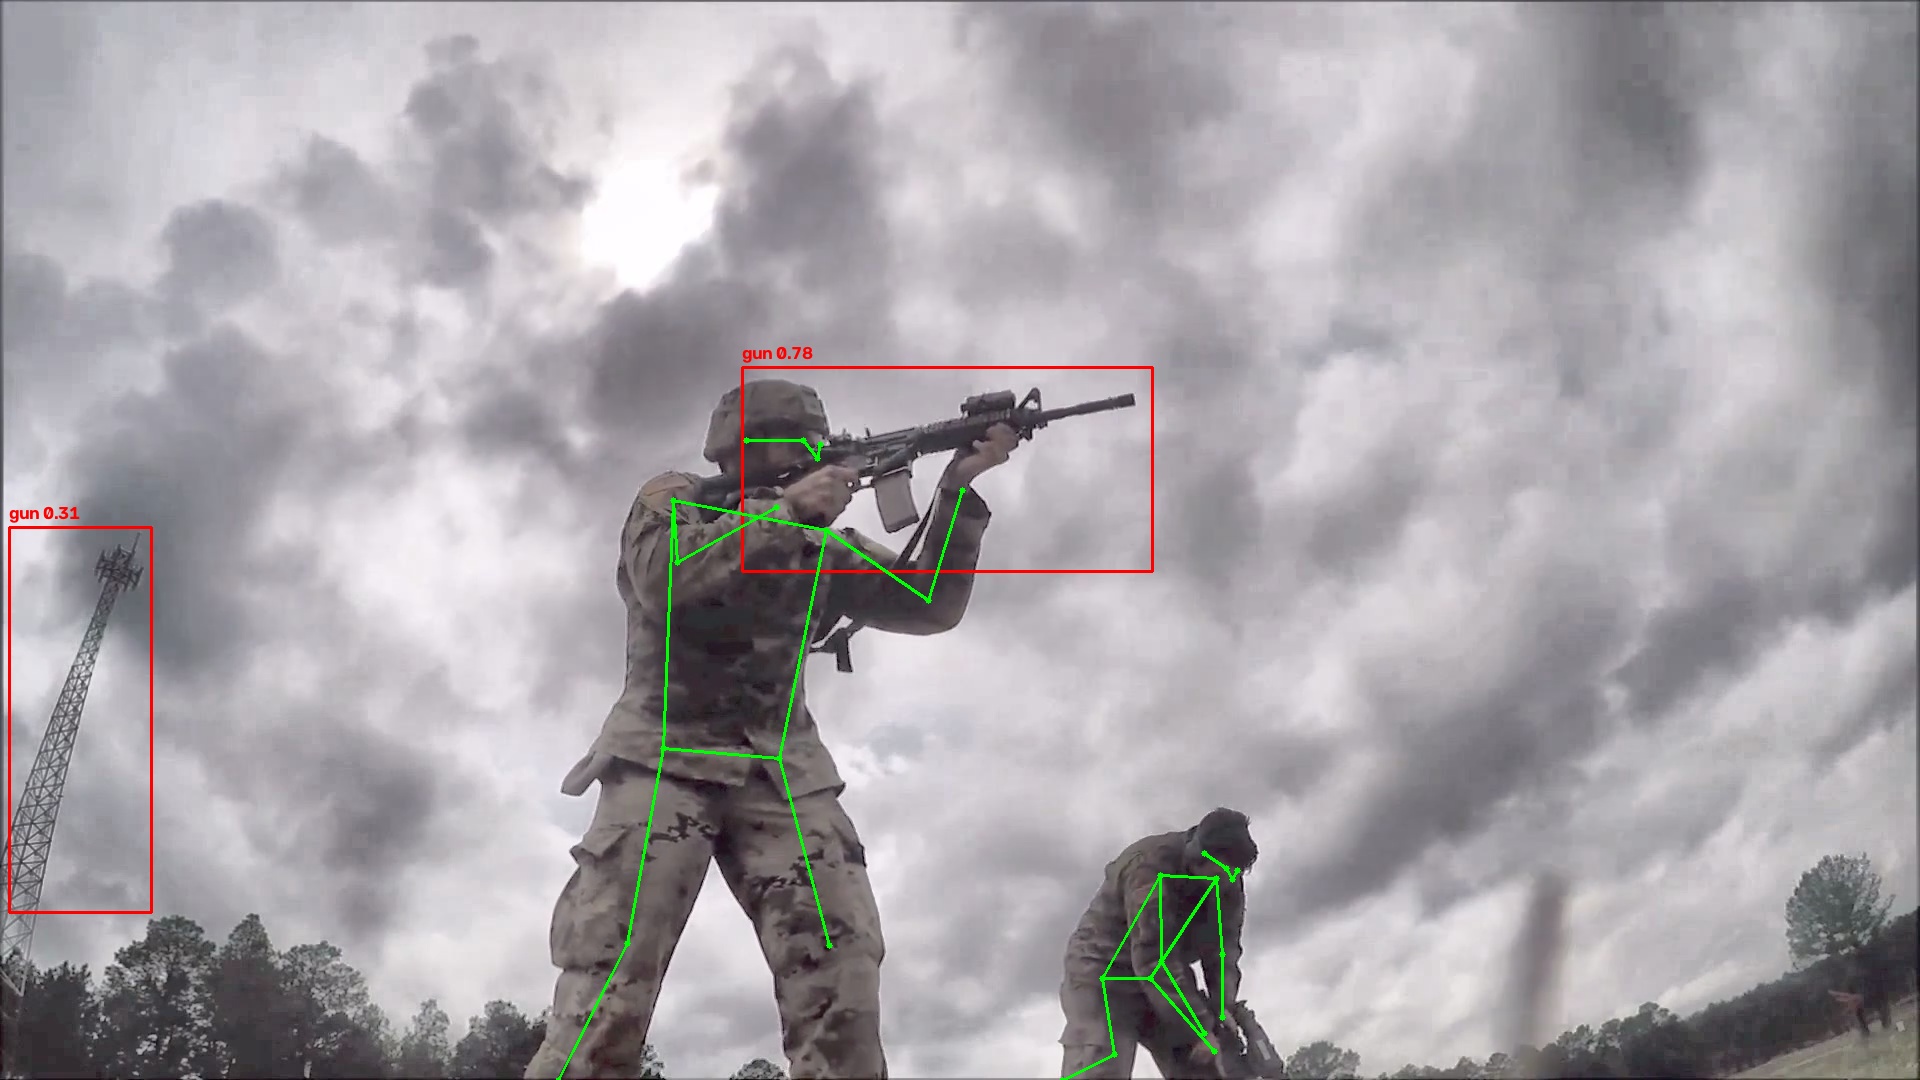
Frame 599 from the same enhanced working copy. Multiple gun boxes and two skeletons show why association matters before geometry. Source footage: WwZBpixr4Yc.
Those two frames already hint at the next post. Detection is not one box. Pose is not decoration. The useful unit is a gun associated with a body.
What I deliberately am not doing yet
It helps to list the temptations I postponed:
- Training a custom detector from scratch when a public dual-YOLO stack already finds guns and people well enough on hand-picked clips.
- Solving phone-versus-gun hardening for every vertical short on the internet.
- Fitting a full 3D weapon model when a stable 2D axis Δ already answers the feel question.
- Publishing a private research tree as if it were a product.
The public tools I lean on are boring in a good way. Ultralytics YOLO for detection and pose. A public MIT firearms detection project I will name properly in part 2. OpenCV for classical edges and line hypotheses once I have a region of interest. Everything else is glue and judgment.
Measuring before tuning feel
The takeaway from this first post is almost managerial. If the complaint is about recoil feel, the first deliverable is a measurement plan, not a larger impulse in the animation graph. YouTube became my lab because it gave me repeatable, citeable footage I could re-open next week and ask the same question again: what is the barrel-axis angle doing across the shot?
That question only becomes trustworthy after the detector, the pose association, and the tip geometry stop lying. Parts 2 through 4 are the path through those lies.
Source footage
Analysis frames in this series are overlays on publicly available YouTube videos:
- https://www.youtube.com/shorts/FPXuHKrMTwE
- https://www.youtube.com/watch?v=WwZBpixr4Yc
- https://www.youtube.com/shorts/RbRxdz8ofSs
- https://www.youtube.com/watch?v=b2wOTXJ3wXk
- https://www.youtube.com/watch?v=2umbSAzgk-8
Continue the series
- 1. Why YouTube Became My Lab — this post
- 2. Detect the Gun, Then the Body
- 3. When the Green Lines Lied
- 4. Tip First, Then the Rails
Written with Grok (grok-bot) via Grok Bot.